
Troubleshooting Paving Joints: Why Your Jointing Compound Is Cracking, Washing Out or Staining
If jointing compound is cracking, washing out or staining the paving, the cause is usually one of a small number of issues: shallow joints, poor preparation, unstable paving, wrong product choice, weak compaction, bad drainage, early cleaning or surface incompatibility.
Jointing compound is a finishing and stabilising product. It is not a repair system for loose slabs, failed bedding or poor drainage. A good product can fail early if it is used in joints that are too narrow, too shallow, dirty, wet in the wrong way, poorly compacted or exposed to movement.
For Geo-Fix-specific options, use Geo-Fix paving jointing compounds. Use this guide first to diagnose the failure before buying more compound or reapplying it over the same problem.
Quick Answer: Why Is My Jointing Compound Failing?
- Safest default: stop re-jointing until you have checked that the paving is stable, the joints are deep enough and drainage is working.
- Cracking: usually points to movement, shallow joints, poor compaction or freeze-thaw stress in wet joints.
- Washing out: usually points to weak preparation, early water exposure, shallow joints, poor drainage or pressure washing too soon.
- Staining or haze: usually points to surface sensitivity, residue left on the paving, poor clean-down or product incompatibility.
- Do not sweep new compound over loose, dirty or failed material. Failed joints should be raked out to a sound, suitable depth first.
- Pause before using any product if you cannot confirm joint width, joint depth, surface type, stability and product compatibility.
What This Guide Does Not Solve
This guide does not fix rocking slabs, hollow bedding, failed sub-base, poor falls, drainage failure, spreading edges or vehicle-load problems. If the paving moves, the jointing will usually fail again.
It also does not replace the current product label or technical data sheet. Geo-Fix, Sika, Joint-It, EASYJoint and other compounds have different joint-size requirements, working methods, curing behaviour and clean-down rules.
This guide does not assume the product is always at fault. Many jointing failures come from installation conditions, preparation or paving movement rather than the compound itself.
When to Pause or Escalate
Stop before re-jointing if slabs rock, joints are below the product’s minimum depth, water pools after rain, the old jointing is loose, or the surface is porous and already showing staining.
Reapplying compound over these conditions may hide the issue briefly and fail again later.
Escalate to professional help if the paving carries vehicles, has repeated joint failure, drains badly, contains expensive natural stone, or has widespread movement. A jointing product should not be used to compensate for a weak base.
Pause before using pressure washing to remove failed joints. High-pressure water can strip more jointing material, widen weak joints, disturb block paving sand and push water into areas that need to dry before repair.
Why Paving Joints Fail
Joint size is wrong for the product
Most paving jointing products have minimum joint width and depth requirements. Geo-Fix Original guidance states a minimum joint width of 5mm and a minimum joint depth of 25mm, while Sika states FastFix All Weather is for joints over 5mm wide and 20mm deep. These numbers are not decoration; they are part of the product’s ability to compact and hold in the joint.
For areas exposed to light vehicular traffic, always check the current product data sheet, as deeper joint requirements and bedding conditions may apply.
If the joint is too shallow, the compound may sit as a thin cap rather than a full-depth joint. Thin caps are more likely to crack, loosen or wash out.
The joints were not prepared properly
Jointing compound needs a clean cavity. Loose dirt, oil, debris, grease, weeds and old failed jointing can stop the material compacting and bonding correctly. Geo-Fix technical guidance stresses that paving should be free from loose dirt, debris, oil and grease, while Sika guidance refers to joints being free from standing water, dirt, debris and weeds.
The paving is moving
Jointing compound is not structural bedding. If slabs rock or blocks move, the joint is being flexed every time the surface is used. That movement can crack, loosen or break out the jointing, even where the product itself is suitable.
Drainage is poor
Water sitting in or below joints increases the chance of softening, washout, frost stress, algae growth and surface staining. If the same joints keep failing after rain, check falls, base drainage, edge restraint and whether water is trapped by surrounding levels.
The surface is sensitive
Porous, textured, honed, dark or high-value natural stone can be more likely to show residue, colour change or haze. A small test area is not optional on sensitive paving. It is the practical way to check clean-down behaviour and staining risk.
Failure Type 1: Cracking
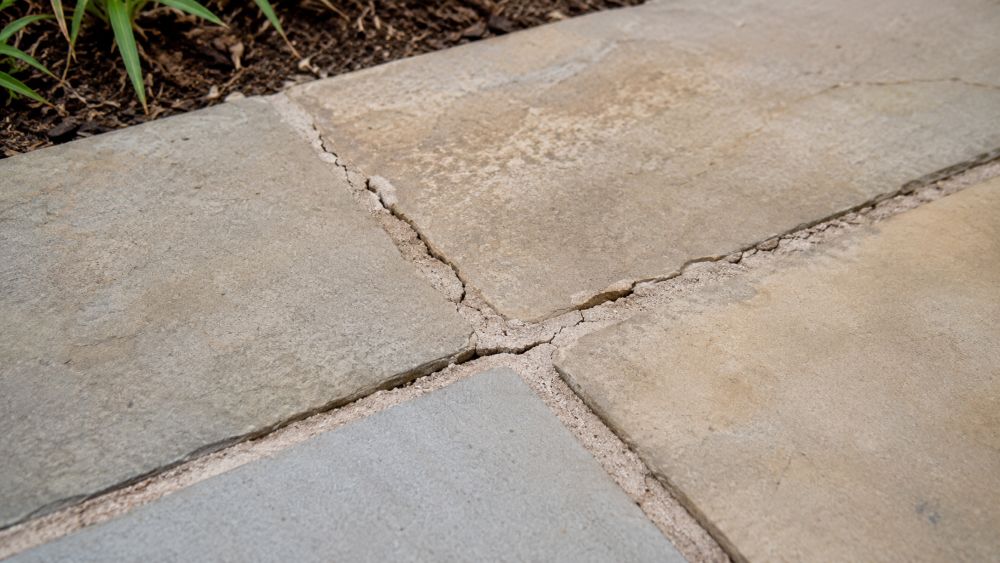
What cracking usually means
Cracking usually means the joint is under stress or the compound is not properly supported. Common causes include shallow joints, moving slabs, poor compaction, freeze-thaw exposure, weak edges or a product used outside its stated joint dimensions.
How to check the cause
Walk the paving slowly and listen for hollow sounds. Push gently on slab corners. Look for cracks that follow moving slabs, low points or edges. Probe the joint depth. If cracking appears mainly where slabs move or water collects, the surface system is the issue.
What to do next
Do not simply top up cracked joints. Rake out loose or failed material to a sound depth, check the paving is stable, and confirm the product’s minimum joint size before re-jointing. If the slabs move, repair the bedding first.
Failure Type 2: Washing Out
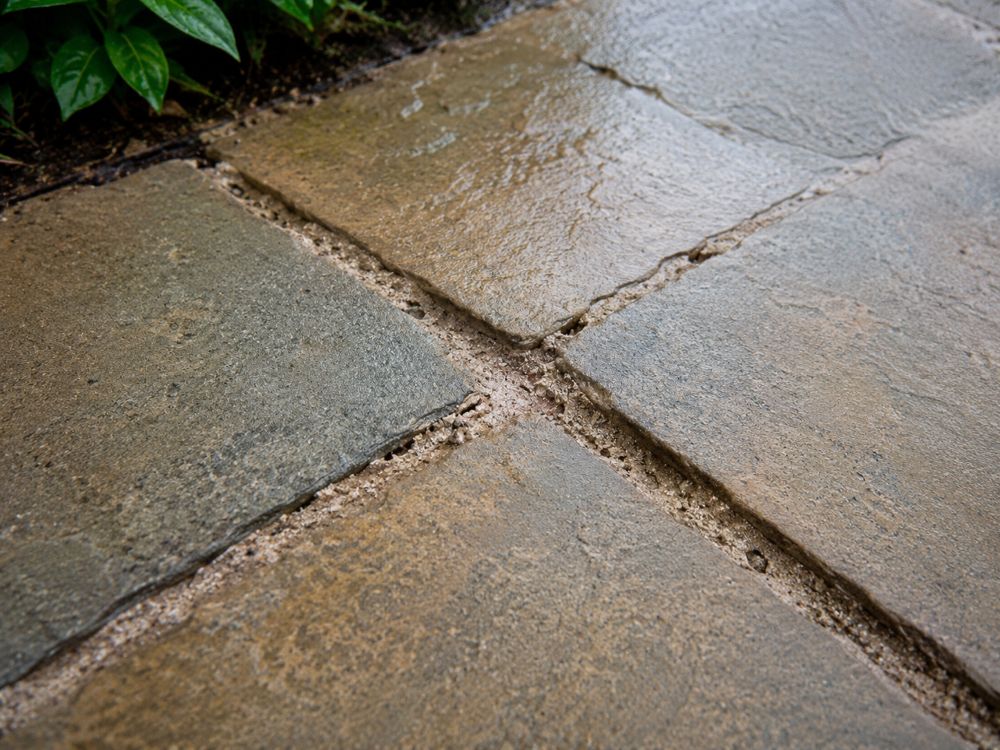
What washout usually means
Washout usually means the jointing material was not secure enough before water, cleaning or weather affected it. Causes include poor compaction, shallow joint depth, rain or rinsing at the wrong stage, pressure washing too early, standing water, or using the product in joints outside its requirements.
How to check the cause
Look at where the material has gone. If washout is worst at low points, drainage is involved. If it is worst after cleaning, the method may have been too aggressive. If the material has disappeared evenly across the patio, joint depth or compaction may be the issue.
What to do next
Remove loose material and clean the joint properly. Confirm the joint depth and width. Re-joint only when the paving is stable and the product method can be followed fully. Avoid pressure washing new joints until the product guidance allows it.
Failure Type 3: Staining or Haze
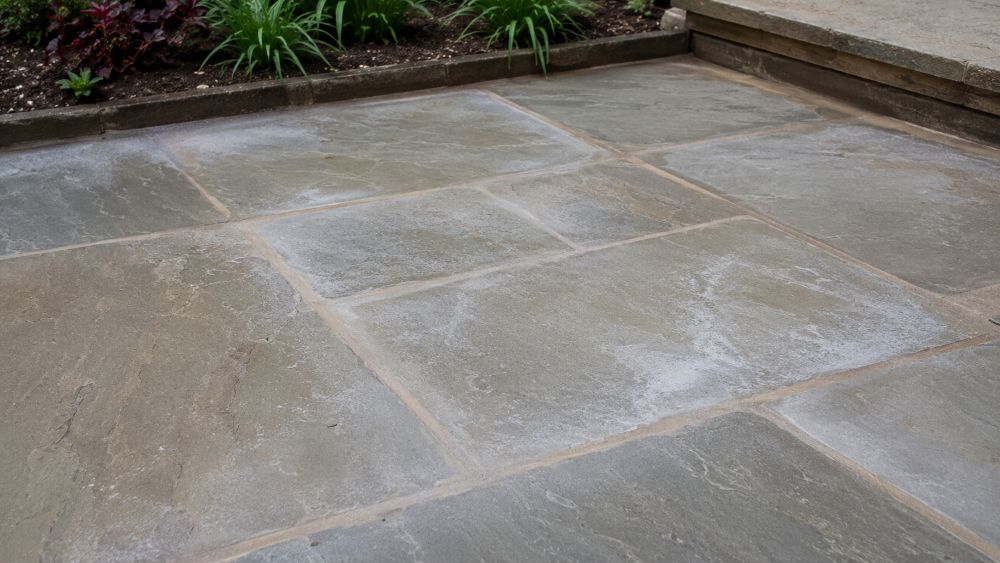
What staining usually means
Staining, haze or residue can come from product left too long on the paving face, insufficient pre-wetting where required, porous stone, uneven clean-down, overworking the product, dirty water drying on the surface, or using the wrong compound for the material.
How to check the cause
Check whether the marks follow slab texture, low areas, brush patterns, joints or surface edges. If the staining is strongest around joints, residue or clean-down is likely. If it appears across porous slabs, compatibility or surface absorption may be involved.
What to do next
Do not apply another product over staining until the cause is understood. Allow the surface to dry fully, then follow the compound manufacturer’s cleaning guidance. On high-value or porous stone, seek advice before using strong cleaners.
Failure Type 4: Weeds Returning Through Joints
Weeds returning does not always mean the compound failed. Seeds can land in surface dirt and germinate in shallow debris. However, weeds growing from cracks inside failed joints suggest voids, cracking, shallow fill or old organic material left in the joint.
RHS guidance notes that weeds in foot-traffic areas can make ground uneven and slippery when wet, so failed joints should be treated as a maintenance and safety issue, not just a cosmetic defect.
Decision Framework: Clean, Re-Joint, Repair or Get Help?
1. Is the paving stable?
If the paving moves, repair the bedding or base before re-jointing. Jointing compound is not designed to hold unstable slabs in place.
2. Are the joints wide and deep enough?
Measure several joints, including the narrowest and shallowest points. Do not rely on the best-looking section. Chamfered paving can look wide at the top but narrow lower down.
3. Is the joint clean?
Remove loose compound, soil, weeds, oil, grease, moss and debris. New material needs a sound cavity. If you are sweeping compound into dirt, the joint is already compromised.
4. Is water the hidden cause?
Check the surface after rain. If water sits in the same place, fix drainage, falls or base issues before re-jointing. Repeating the same product in the same wet failure zone is unlikely to solve the problem.
5. Is the surface sensitive?
Pause before applying compound to porous, dark, honed, expensive or unknown stone without a test area. Test the application, compaction and clean-down method first.
Step-by-Step: How to Diagnose Failed Paving Joints
Step 1: Photograph the failure
Take photos before removing anything. Capture cracking, staining, gaps, low points, edges and drainage patterns. This helps identify whether the issue is local or widespread.
Step 2: Check movement
Walk the surface and press slab corners. If you feel movement, mark those slabs. Do not re-joint moving slabs until the bedding problem is corrected.
Step 3: Probe joint depth
Use a thin tool to check the depth of the failed joint. Compare the real depth with the product’s minimum requirement.
Step 4: Check joint width
Measure several joints. If some areas are below the product’s minimum width, the product may not have been suitable for the whole patio.
Step 5: Inspect drainage
After rain, check whether water sits, tracks through joints, or flows towards walls and thresholds. Poor drainage should be treated before re-jointing.
Step 6: Identify the paving surface
Confirm whether the surface is porcelain, sandstone, limestone, concrete, granite, slate or block paving. Surface type affects staining risk and clean-down method.
Step 7: Choose the repair route
If the paving is stable and the joints are suitable, re-joint using the correct product and method. If the paving moves, repair first. If the surface is sensitive or staining is severe, seek specialist advice.
Common Mistakes
Re-jointing over failed material
Loose, cracked or contaminated jointing should be removed. Topping over failure rarely lasts.
Ignoring joint depth
Joint width is visible, but depth is where durability is made. A shallow cap is more likely to fail.
Choosing by brand or colour only
Geo-Fix, Sika and other products have different requirements. Colour should come after technical fit.
Pressure washing too soon
Pressure washing can strip new or weak joints. Follow the product’s curing and cleaning guidance before using aggressive cleaning.
Not compacting the joint properly
Many jointing compounds need full compaction. Voids inside the joint create weak points where water and frost can attack.
Ignoring staining risk
Porous and textured paving can hold residue. Always patch test sensitive stone and work in manageable sections.
Maintenance and Prevention
Keep paving joints clear of leaves, soil, moss and standing debris. Organic material holds moisture and encourages weeds, staining and surface growth.
Inspect joints after winter, heavy rain and deep cleaning. Small cracks and gaps are easier to fix before they become widespread washout.
Use cleaners and pressure washers carefully. Aggressive cleaning can damage both the paving face and the joint system. If the surface needs broader maintenance, browse our Path, Patio and Driveway range for suitable cleaners, treatments, sealers and repair options.
Your Next Step: DIY or Professional
DIY repair is usually suitable where paving is stable, joints meet the product size requirements, staining is minor, and the surface material is known.
Professional help is the safer route where slabs move, the same joints repeatedly fail, drainage is poor, the surface is expensive natural stone, the area carries vehicles, or staining cannot be safely removed.
For Geo-Fix-specific replacement options, use Geo-Fix paving jointing compounds. For broader jointing alternatives, use Patio Path and Driveway Pointing. For Sika alternatives, use Sika paving and pointing compounds.
Summary
Cracking, washout and staining usually come from a small group of causes: joint dimensions, preparation, compaction, movement, drainage, cleaning method and surface compatibility. The product matters, but the site conditions matter just as much.
Do not reapply jointing compound until you have checked stability, joint width, joint depth, drainage and surface type. If those checks pass, re-joint carefully using the current product guidance. If they fail, repair the surface system first.
Frequently Asked Questions
Why is my jointing compound cracking?
Cracking usually comes from slab movement, shallow joints, poor compaction, weak edges or water sitting in the joint. Check whether the paving moves before re-jointing.
Why is my jointing compound washing out?
Washout is commonly linked to shallow joints, poor compaction, early water exposure, pressure washing too soon, poor drainage or using the product outside its joint-size limits.
Why has jointing compound stained my paving?
Staining can be caused by surface sensitivity, residue left on porous stone, poor clean-down, uneven wetting or product incompatibility. Test areas help prevent this.
Can I top up failed jointing compound?
Only if the remaining material is sound and the product allows it. Loose, cracked, dirty or contaminated material should be removed before re-jointing.
What joint depth do I need for Geo-Fix?
Geo-Fix Original is commonly associated with minimum joints around 5mm wide and 25mm deep. Always check the current product data sheet before use.
Can jointing compound fix loose slabs?
No. Loose slabs need bedding or base repair first. Jointing compound finishes the joint; it should not be used as a structural repair.
Should I pressure wash before re-jointing?
Only with care. Pressure washing can remove loose material, but it can also damage joints and drive water into the surface. Let the area dry and check stability before re-jointing.
Which product should I use after joint failure?
Choose based on paving type, joint width, joint depth, exposure, drainage and traffic level. If the original product failed because of preparation or movement, switching product alone may not solve it.

Path & Patio is a UK supplier of paving and landscaping products, sharing practical guidance, product expertise and installation advice for patios, paths and driveway projects.