
Using Online Calculators and Design Tools to Plan Patios, Paths and Decking
Most outdoor projects go wrong before the first slab, board or paver is installed. Poor measurements, unclear layout, missing falls, awkward corners and forgotten cuts can lead to wasted materials, extra deliveries and a finish that feels slightly wrong every time you use the space.
Online calculators and design tools are useful, but they are only as accurate as the measurements entered into them. A calculator can estimate area, board count, paving quantity or sub-base volume. It cannot see a sloping garden, a doorway threshold, a drain cover, a curved border, an uneven wall or a fence line that is not square.
The safest planning method is to combine digital estimates with physical marking out. Measure the area, sketch the layout, check levels, mark the edges, walk the route, then use calculators to estimate materials. For tapes, markers, chalk lines, layout tools and site measuring equipment, use Marking and Measuring Tools.
Quick Answer: How Should You Plan Before Buying Materials?
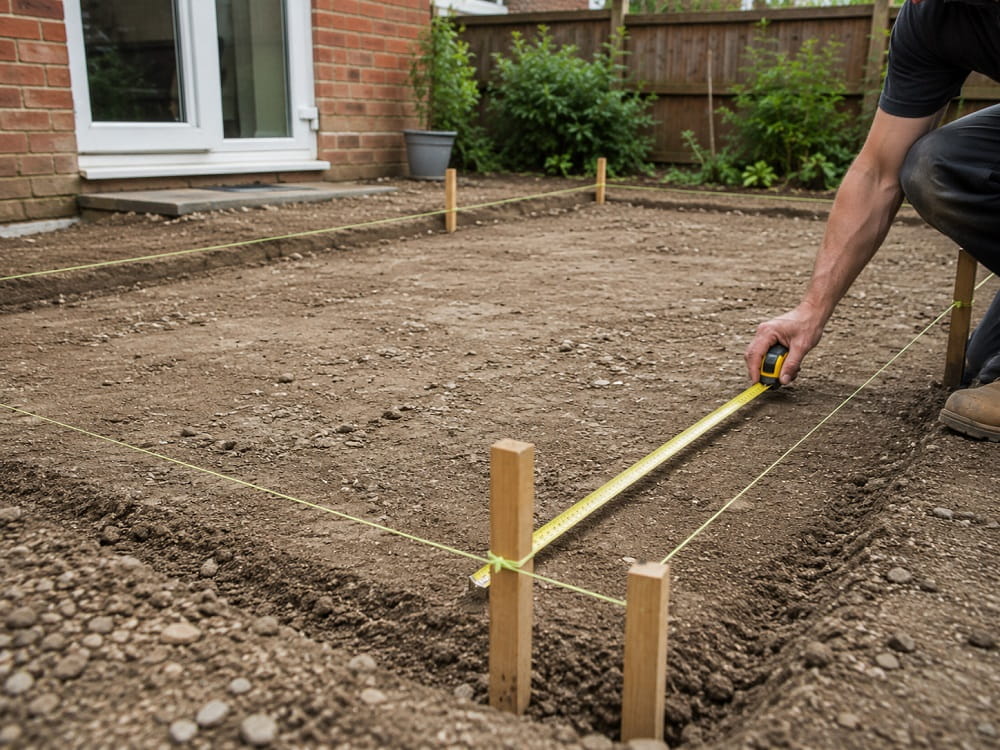
- Safest default: measure and mark out the real area before relying on an online calculator.
- Use calculators to estimate quantities, not to replace site checks.
- Measure length, width, diagonals, door thresholds, drains, steps and fixed obstacles.
- Allow for cuts, waste, breakages, pattern matching and spare material.
- Check falls and water direction before ordering paving or decking materials.
- Pause before ordering if the site is sloped, irregular, close to a threshold, affected by drainage, or part of a front garden paving project.
What This Guide Does Not Solve
This guide does not design structural decking, retaining walls, drainage systems or load-bearing hard landscaping. It is a planning guide for patios, paths and decking layouts, not an engineering specification.
It also does not guarantee that a calculator will produce the exact amount of material needed. Online calculators depend on the measurements, assumptions and waste allowance entered by the user. Irregular areas, diagonal patterns, curves, damaged materials and last-minute layout changes can all change the final quantity.
Finally, this guide does not replace product-specific installation instructions. Paving, porcelain, natural stone, block paving, decking boards, joists, sub-base materials and jointing products all have their own installation requirements.
When to Pause or Escalate
Stop before ordering materials if water currently runs towards the house, pools near thresholds, collects around drains, or sits on the planned area after rain. In those cases, the issue is not just quantity calculation. Levels and drainage direction need to be resolved first.
Pause before paving a front garden or changing a driveway-style area. The Planning Portal guidance on paving front gardens explains when permeable surfacing or drainage to a lawn or border matters for planning permission.
Escalate to a professional if the project involves complex falls, retaining edges, multiple levels, steps, drainage channels, wheelchair access, structural decking, heavy loads, or lots of paving cuts. Cutting paving blocks, kerbs and flags can create high levels of silica-containing dust, so unnecessary cuts should be planned out where possible.
Why Planning and Marking Out Matter
Calculators estimate; they do not inspect
An online calculator can be useful for working out square metres, board quantities, sub-base volume, laying-course material or jointing material. It cannot check whether the space is square, whether the fall is correct, or whether the design creates awkward cuts at the edges.
Use calculators after measuring and sketching, not before. The PavingExpert calculators page is a useful example of how many different material estimates may be needed across paving work, from flags to sand and cement.
Physical marking shows real usability
Marking out the area with string, paint, chalk, pegs or marker lines helps you see the project at full size. A patio that looks generous on a screen may feel tight once furniture is marked out. A path that looks straight on a sketch may cut awkwardly across the garden when walked.
Lines and levels prevent avoidable faults
Outdoor surfaces need water to move in the right direction. Lines, levels and falls help prevent puddles, awkward thresholds and surfaces that drain towards buildings. Specialist paving guidance treats working lines and levels as core set-out tasks, not optional extras.
Core Planning Tools Explained
Online area calculators
Area calculators are useful for simple rectangles, squares and basic shapes. For a rectangular patio or deck, they can estimate square metres quickly. For irregular shapes, split the area into smaller rectangles, triangles or circles and calculate each part separately.
Material calculators
Material calculators can estimate paving units, boards, sub-base, bedding material, jointing compound, sand, cement or gravel. They are useful for budgeting and ordering, but they need realistic wastage allowances.
Design tools and sketches
Design tools can help visualise size, pattern and orientation. A simple scale sketch can be just as useful as a digital design tool for smaller jobs. Mark fixed features such as walls, fences, inspection covers, drains, steps, trees and doors.
Tape measures and measuring wheels
A good tape measure is the basic tool for patios and decking. Measuring wheels can be useful for longer paths, driveways and garden routes. Always measure more than once and record the dimensions clearly.
String lines, chalk lines and markers
String lines and markers help set straight edges, corners, post lines, paving edges and decking frames. They also help reveal whether a design is square, whether a boundary is straight and whether cuts are likely at the edges.
Squares and diagonal checks
For rectangular patios and deck frames, diagonal measurements are useful. If both diagonals match, the rectangle is a square. If they differ, the layout may need adjusting before materials are cut or fixed.
Decision Framework: Calculator, Sketch, Mark Out, or Get Help?
1. Is the shape simple?
If the area is a simple rectangle, an online calculator plus tape measurements may be enough for an early estimate. Still mark it out before ordering, because walls, fences and existing edges are not always square.
2. Are there curves, diagonals or patterns?
Curves, diagonal paving patterns, herringbone, picture-frame borders and board layout changes create more cuts and waste. Use a sketch and add a realistic waste allowance. Consider professional help if cuts are complex or expensive materials are involved.
3. Does water need to move across the area?
If the patio, path or deck is near a doorway, wall, drain, gully or air brick, levels matter. Do not rely on a material calculator alone. Mark out levels and falls before ordering.
4. Is access important?
If the area must suit bins, wheelbarrows, pushchairs, mobility aids or frequent foot traffic, mark out the route and test the width. A narrow path may look fine on paper but feel awkward in use.
5. Are you trying to avoid cuts?
Pause before ordering if the layout creates thin slivers, awkward edge cuts or repeated small cuts around obstacles. Adjusting the design before buying materials can save labour, reduce waste and improve the final look.
Step-by-Step: Plan a Patio, Path or Decking Area
Step 1: Define the purpose
Decide whether the area is for seating, dining, access, bins, storage, a shed route, a hot tub, garden furniture or everyday walking. The purpose affects width, strength, surface choice and layout.
Step 2: Measure the existing space
Measure length and width in more than one place. Check whether opposite sides match. Record doors, drains, walls, fences, steps, inspection covers and fixed obstacles.
Step 3: Mark the outline physically
Use string, chalk, marker paint or pegs to show the planned edges. Stand back and walk around the marked area. Check whether it looks balanced, usable and aligned with the house or garden features.
Step 4: Check diagonals and square corners
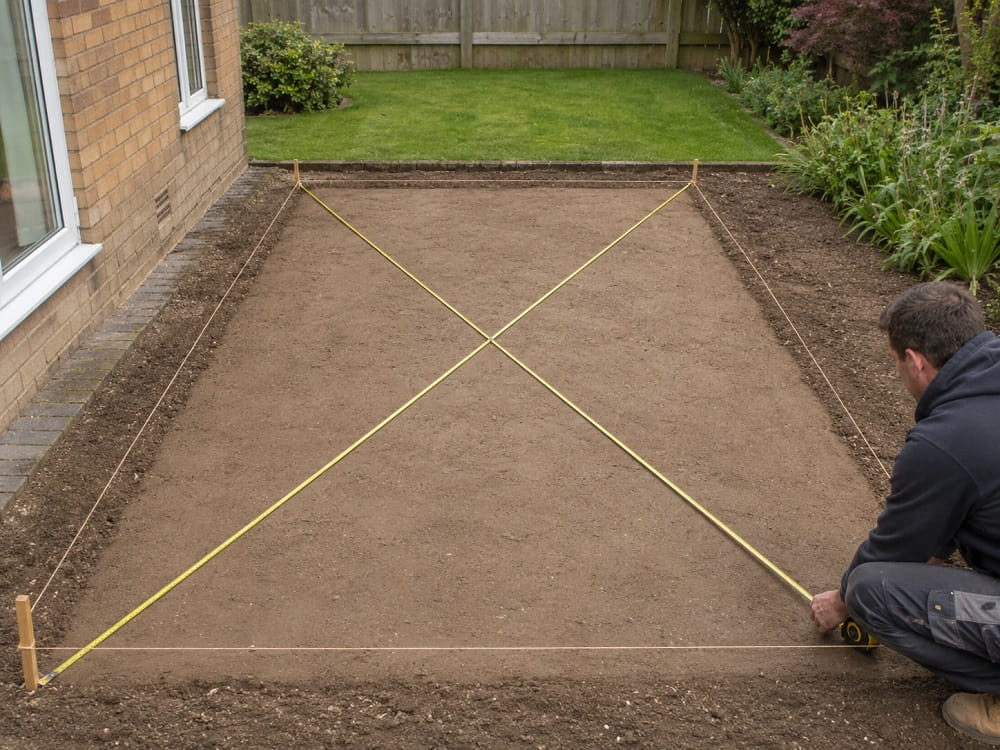
For rectangular areas, measure the diagonals. If they are not equal, the area is not square. Adjust the layout before calculating materials or planning cuts.
Step 5: Check levels and water direction
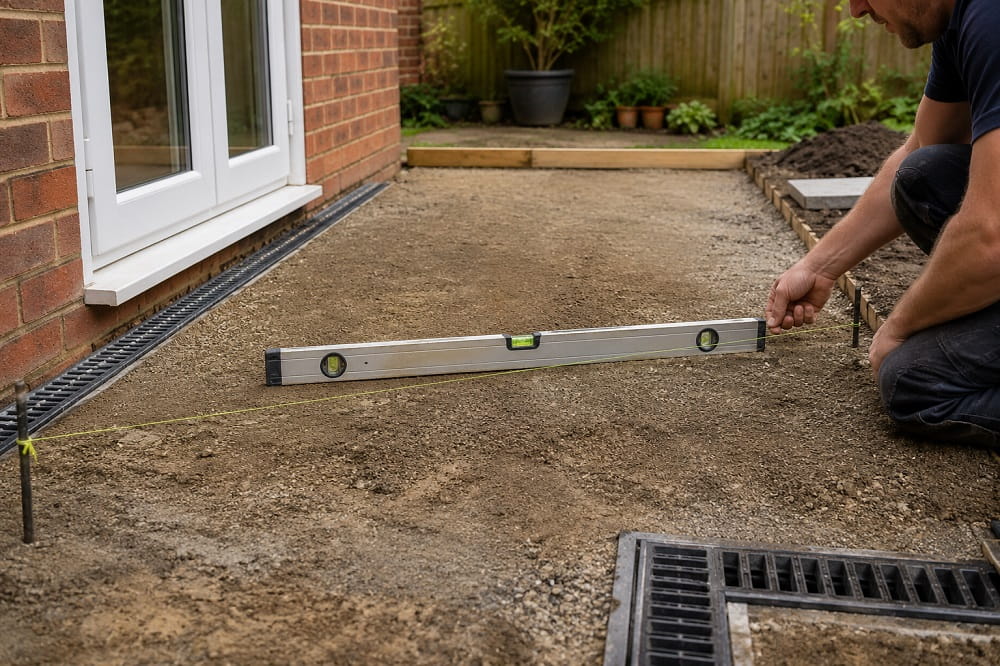
Use a level, string line or laser level where appropriate. Decide where the water should go. Avoid directing water towards buildings, thresholds, air bricks, garages or low points where it cannot escape.
Step 6: Sketch the layout
Create a scale sketch or simple measured drawing. Include the material size, joint width, board direction, paving pattern, border detail and likely cut edges.
Step 7: Use calculators for material estimates
Enter measured dimensions into suitable calculators. Calculate surface area, sub-base, laying course, boards, fixings, jointing and waste separately where needed.
Step 8: Add waste allowance
Add extra material for cuts, breakages, pattern matching, future repairs and mistakes. The correct allowance depends on material, pattern and layout complexity.
Step 9: Review before ordering
Check measurements, layout, levels, access and waste allowance before buying. Most planning mistakes are cheaper to fix on paper or with string lines than after delivery.
Common Mistakes
Measuring once
One measurement is not enough. Outdoor spaces are often out of square, uneven or affected by previous work. Measure twice and check diagonals.
Using calculator results as the final truth
Calculators are only planning aids. They cannot see awkward cuts, damaged edges, slopes, thresholds or real site constraints.
Forgetting waste allowance
Ordering exactly calculated quantities leaves no room for cuts, breakages or errors. This can cause delays if the same batch or product is not available later.
Ignoring falls and drainage
A flat-looking patio on a plan may hold water in reality. Plan water direction before ordering materials.
Forgetting furniture and access
A patio should be sized around real use. Mark out tables, chairs, bins, planters and walking space before confirming dimensions.
Planning cuts too late
Awkward cuts increase labour, waste and dust risk. Adjust the layout early to reduce unnecessary cutting.
Maintenance and Prevention
Good planning makes maintenance easier. A path with sensible width, drainage and edging is easier to sweep and weed. A patio with fewer awkward cuts and proper falls is easier to clean. A deck with clear board direction and access to fixings is easier to inspect and maintain.
Keep your original measurements, sketches and calculator results after the project. They are useful for ordering spare materials, replacing damaged units, extending a path, or checking where joints and supports sit later.
For wider site tools and project equipment beyond layout tools, use Contractors & Professional Tools. Choose tools based on the task, not just the material being installed.
Your Next Step: DIY or Professional
DIY planning is usually suitable for simple rectangular patios, short paths, small decking areas and straightforward layouts where levels, drainage and access are uncomplicated.
Professional help is the better route where the site has complex falls, multiple levels, drainage issues, front garden compliance questions, expensive materials, structural decking, heavy loads or extensive cutting.
The best next step is to mark out the project at full size before ordering. If it does not feel right in the garden, it will not feel right after installation.
Summary
Online calculators and design tools are useful, but they work best when combined with accurate site measurement and physical marking out. Measure the area, mark the outline, check diagonals, plan levels, sketch the layout and only then calculate quantities.
Accurate planning prevents wasted materials, awkward cuts, poor access and drainage problems. The earlier you identify layout issues, the easier they are to fix. A few extra minutes with a tape, string line and calculator can prevent expensive mistakes later.
Frequently Asked Questions
Can I use an online calculator to plan a patio?
Yes, but use it after measuring and marking out the real area. Calculators are useful for estimates, but they do not replace site checks.
What measurements do I need before using a patio calculator?
Measure length, width, diagonals, fixed obstacles, thresholds, drains, steps and any irregular sections. For complex shapes, split the area into smaller sections.
How much extra material should I allow?
It depends on the material, layout and cuts. Simple layouts need less allowance than diagonal patterns, curves or awkward edges. Always allow for cuts, breakages and spare material.
How do I check if a patio or deck is square?
Measure both diagonals of the rectangle. If they match, the layout is square. If they differ, adjust before cutting or fixing materials.
Do I need to mark out a path before ordering materials?
Yes. Marking out shows whether the width, shape and route work in real space. It is especially useful for curves, narrow routes and paths used by bins or wheelbarrows.
Can calculators work out drainage?
No. Calculators can estimate quantities, but drainage needs level checks, falls and site observation. Watch where the water goes after rain before finalising the design.
Do I need planning permission for a patio or path?
Most rear garden patios and paths do not need planning permission, but front garden surfacing can be affected by drainage rules. Check if impermeable surfacing is planned or if water cannot drain naturally.
What tools do I need for marking out?
Useful tools include a tape measure, string line, marker, square, pegs, chalk line, level and possibly a measuring wheel or laser level for larger areas.

Path & Patio is a UK supplier of paving and landscaping products, sharing practical guidance, product expertise and installation advice for patios, paths and driveway projects.